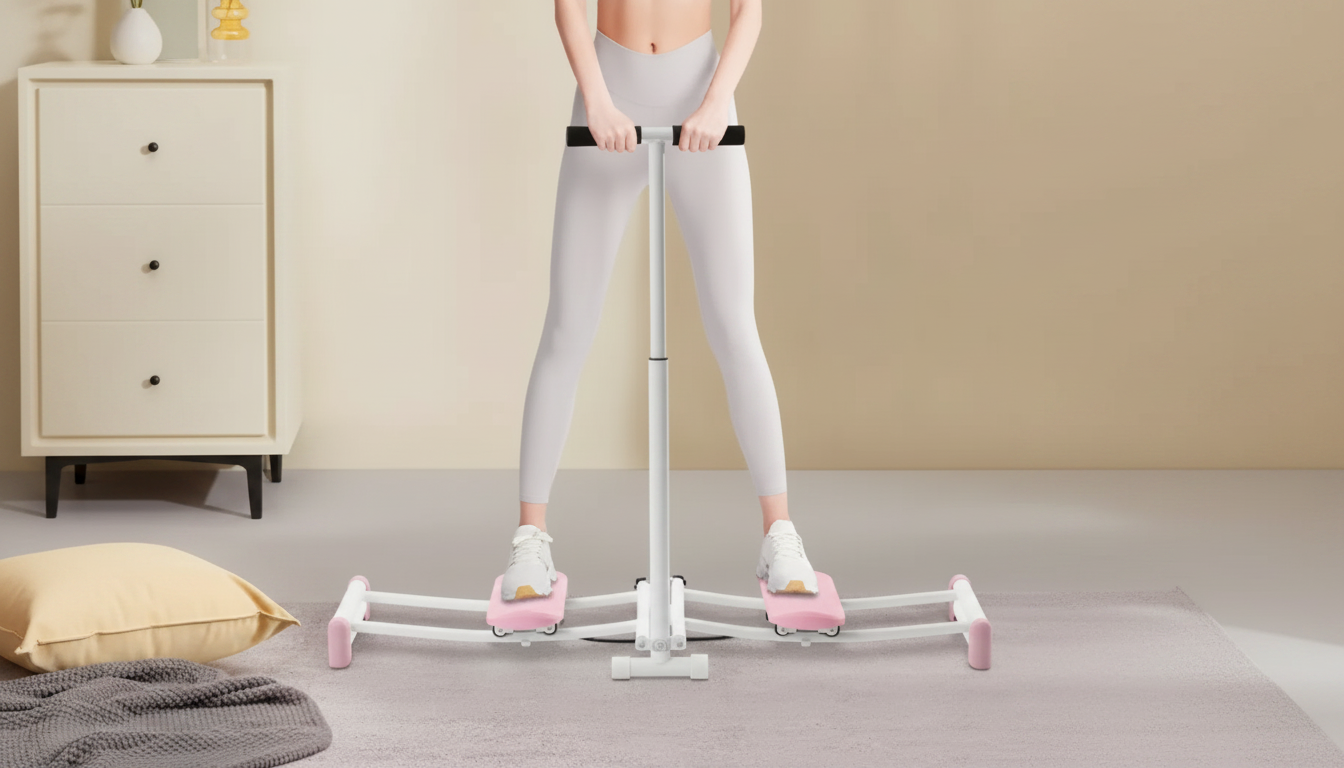
A compact trainer can be a smart way to build consistency: quick sessions, low-impact movement, and clear technique cues that support better control. The Pink Pelvic Floor Trainer & Ski Exercise Machine for Home Strength Workouts combines pelvic floor activation with a sliding “ski” motion that challenges the inner thighs, glutes, hips, and deep core—without needing a full home gym.
Below you’ll find practical setup tips, form cues, a beginner-to-intermediate weekly plan, and common mistakes to avoid so each session feels smooth, controlled, and repeatable.
For broader fitness guidance on strength and conditioning progressions, the American College of Sports Medicine provides helpful training principles and safety considerations (ACSM overview).
Stand tall, soften the knees, and exhale gently as if fogging a mirror. If your ribs flare up or your low back arches, reduce the range and slow the slide until you can keep the torso steady.
If you’re learning pelvic floor contractions (and equally important, relaxation), these guides can be a useful reference point: NHS pelvic floor exercises and ACOG pelvic support problems.
Keep sessions short enough that you can stay consistent. A helpful rule: end most sets with 1–2 reps left “in the tank” so your form doesn’t unravel in the last minute.
| Day | Session | Focus | Time |
|---|---|---|---|
| Day 1 | Steady slides | Form + posture + breathing | 10–12 min |
| Day 2 | Intervals | Light conditioning (30s on/30s off x 8) | 8–10 min |
| Day 3 | Recovery | Gentle walk + pelvic floor relaxation breathing | 10–20 min |
| Day 4 | Steady slides + holds | Control (add 2–3s pause at end range) | 10–12 min |
| Day 5 | Intervals | Moderate conditioning (40s on/20s off x 8) | 8–10 min |
| Day 6 | Accessory strength | Glute bridge, side-lying clamshells, dead bug | 12–18 min |
| Day 7 | Recovery | Mobility: hips, calves, hamstrings; easy breathing | 10–15 min |
For small-space organization, a compact organizer can keep accessories together between sessions. The Black Floral Travel Cosmetic Bag – Large Capacity Makeup & Toiletry Organizer can also work as a simple “workout kit” pouch for bands, socks, and wipes.
The Pink Pelvic Floor Trainer & Ski Exercise Machine for Home Strength Workouts is available now and fits compact home routines where consistency matters more than long sessions. Start by mastering control and breathing, then add time and pace in small steps.
For a calming recovery routine on rest days, consider pairing mobility work with a relaxing environment. The Porcelain Deer Aromatherapy Burner with Lotus Base – Ceramic Incense Holder can help set a wind-down cue after training (especially if you tend to hold tension through the hips and pelvic floor).
Most people do well with 3–5 days per week using short sessions (about 8–15 minutes), alternating slower technique-focused days with interval-style conditioning days. Prioritize quality and stop if symptoms worsen or recovery feels insufficient.
Yes—early on, the inner thighs and deep core often do more of the work while coordination improves. Slow the tempo, use a smaller range of motion, and pair each effort with a gentle exhale and subtle pelvic floor lift (without glute gripping).
It can be part of a gradual return, but it’s best to get medical clearance and, when possible, an individualized pelvic floor assessment. If you notice pressure/heaviness, pain, or worsening leakage, pause training and seek professional guidance, and include relaxation work alongside strengthening.










Leave a comment